If your home has popcorn ceilings, the chances are good that you've considered removing them. Not only is the style outdated, but some popcorn ceilings are also contaminated with asbestos. Luckily, resurfacing a popcorn ceiling is a relatively inexpensive project to do yourself.
In the season one finale of "George to the Rescue," George Oliphant and his team renovated the home of Joel and Kitty Conway and their adult daughter, Jennifer. She has a rare form of muscular dystrophy and is confined to a wheelchair. George plans to make the Conways' house more accessible for Jennifer and give it a big update, which includes removing their popcorn ceilings.
George, contractor Shane Golden, and their teams get to work to give those ceilings a fresh new look. We turned their handiwork into this step-by-step guide to removing your popcorn ceiling.
Get a weekly recap of the latest San Francisco Bay Area housing news. Sign up for NBC Bay Area’s Housing Deconstructed newsletter.
Step 1: Test Your Popcorn Ceilings for Asbestos
Before you do anything else, test your ceiling for asbestos. Popcorn ceilings gained popularity from the 1950s to the1980s because the texture helped soundproof rooms and acted as a fire retardant. At the time, asbestos was a common ingredient when it came to creating the stippled texture these ceilings are named for before it was ultimately banned in the U.S. for posing significant health risks.
The best way to test for asbestos is to contact a professional or your local health department. If your ceiling tests positive, you can either choose to cover it with new drywall or hire an asbestos abatement contractor to help remove the popcorn ceiling. If you do choose to cover it, be sure to wear protective eyewear and a mask.
George to the Rescue
Home Renovation Ideas


Step 2: Gather All the Tools You'll Need to Remove a Popcorn Ceiling
If you've determined your ceiling is asbestos-free and you want to proceed with resurfacing, here is a full list of all the tools you'll need.
- Ladder
- Plastic drop cloth or tarp
- Painter's tape
- Safety gear (mask, protective eyewear)
- Spray bottle
- Paint scraper
- Small putty knife
- Spackle
- Sander
- Primer
- Paint

Step 3: Prepare Your Workspace
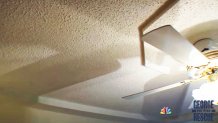
Get ready for dust! Before you get to work removing your popcorn ceiling, you'll need to prepare the room. Start by removing any large furniture that you can. Next, use a plastic tarp or drop cloth to cover the rest of the room, including the floors. You'll be using water, so using a plastic tarp — not canvas — is crucial to make sure no water soaks through. Also, turn off the power to any electrical boxes, then remove all lighting fixtures and ceiling fans. You'll also want to make sure the room is properly ventilated.
Step 4: Wet the Ceiling
Next, it's time to prep the ceiling. Fill your spray bottle with warm water mixed with a couple of drops of dishwashing soap. Apply a light mist to the ceiling - enough to loosen the material without damaging the drywall underneath it. Moistening the ceiling will make it easier to scrape and prevent dusting when removing the popcorn. Allow the ceiling to soak for about 15 minutes before scraping.

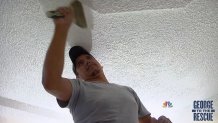
Step 5: Remove the Popcorn Ceiling
Now it's time to start scraping. Make sure to wear a mask that covers your nose and mouth, as well as protective eyewear. Scrape the ceiling in small sections using the paint scraper. The Home Depot experts recommend using a small putty knife to scrape around corners and crown molding.
Step 6: Patch and Sand the Ceiling
Once the scraping is complete, you may need to patch some areas of the ceiling. Apply a small amount of spackle to the putty knife and slowly smooth over any holes and cracks to even out the surface.

Once it's dry, gently sand the ceiling, but be careful not to damage any areas.
George's favorite sander is the 3M pro-grade precision sponge.
"It fits right in the palm of your hand. It's flexible, and it's got this diamond channeling that allows the dust to go straight down and not all over the place," he said.
Step 7: Prime and Paint
You're almost there! To get that finished look, you'll want to prime the ceiling, followed by painting it whichever color you want. Once it's dry, restore the electricity, remove the tarp, and arrange the room back to normal.
Take a look at the before and after of the ceiling in Jennifer's bedroom. The textured ceiling is gone and replaced with a coat of fresh paint for a beautiful, modern look.
Some of the tips mentioned above were sourced from The Home Depot.
See more full episodes of George to the Rescue: